a.k.a. Steps to Backup and Restore a vCenter Server 5.5 Lab Environment
While working on my last blog post -
the hunt for the elusive dvSwitch configuration - I experienced the humbling reality that my vCenter Server 4.1 backup and recovery experience was in desperate need of a refresh. I had been confident that I could backup and recover a vCenter Server environment without any problems, but the differences between 4.x and 5.x really interfered with my recovery process. In fact, even while preparing this article, I came across key differences between 5.1 and 5.5 specific to the backup and recovery of SSO.
The theme of this article is simple:
do not simply rest on your laurels; instead, have an up-to-date, well documented, tested, and proven backup and recovery strategy.
I would like to share the backup and recovery steps that I found worked well in my vCenter Server 5.5 lab environment.
This article does not talk about Update Manager. For the purpose of this discussion, when I refer to the vCenter server I am talking about standalone components running on a Windows server which utilizes a separate database server.
Please note, this is not a comprehensive step-by-step guide, but instead focusses on the main ideas behind the processes that suceeded in my lab environment. VMware has several well written KBs and documents that explain the individual steps in more details - there is no need for me to re-invent the wheel.
Disclaimer: I am not responsible for the validity or currency of this content, nor am I responsible for what is done with the information or ideas found within. I am not an expert, and the content found on this site should not be treated or viewed as professional advice, fact, or absolute.
Lab Setup
For this article, my home lab consisted of:
- vCenter Server 5.5 on Windows Server 2012
- MS SQL Server 2008 R2 SP3 on Windows Server 2012
- 2x ESXi 5.1 Hosts
- 2x ESXi 5.5 Hosts
- Active Directory on Windows Server 2012
 |
| My vCenter environment ready to be backed up. |
Backup Process
Backup the vCenter Database
First, backup up the vCenter Server database using the tool of your choice. In my case, I used MS SQL Management Studio.
If you have begun to use vSphere 5.5, you may have also noticed that there is no longer a separate RSA database used for the SSO component.
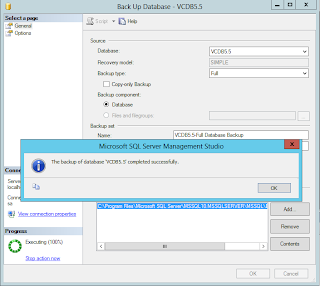 |
| Backing up my vCenter DB using MS SQL Management Studio. |
Backup the vCenter Server SSL Certificates
This is an important step, and if you have tried to recover vCenter Server without these, you may have noticed that the ESX hosts remain in a disconnected (from vCenter) state.
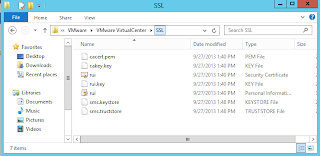 |
| Contents of my vCenter Server SSL folder. |
Reference:
Backing up and restoring vCenter Server 4.x and 5.0 (1023985)
With vSphere 4.x this is probably where you stopped; however, beginning in vSphere 5.x, VMware has distributed the vCenter Server workload between various components such as the Inventory Service. Therefore, we will also consider this and SSO.
Note: In vSphere 5.5, SSO no longer required the RSA database that I had created on my DB server for version 5.1.
Backup the Inventory Service Database
This is easily accomplished by running a batch file (backup.bat) which is included in the Inventory Service install. In my environment I ran the backup script from PowerShell (as an Administrator), and then copied the output file to my backup repository:
.\backup.bat -file Inventory_Service_DB.backup
 |
| Backing up the Inventory Service database. |
Reference:
Back Up the Inventory Service Database on Windows
Backup Single Sign-On (SSO)
The method to backup and restore the SSO component has changed significantly between vSphere 5.1 and 5.5.
Here is what I followed for 5.5:
- Generate an SSO log bundle, as an Administrator.
- I found that I did not actually use the log bundle to restore SSO; however, I am assuming that this may be beneficial by VMware, or the administrator, if there are some issues with the restore process.
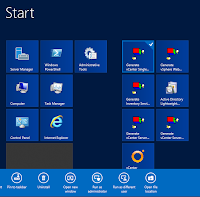 |
| Generate the SSO log bundle. |
- %ProgramData%\VMware\CIS\runtime\VMwareSTS\conf
- %ProgramData%\VMware\CIS\data\vmca
- %ProgramData%\VMware\CIS\cfg\vmkdcd
- %ProgramData%\MIT\Kerberos5
- This can be done by running vdcbackup which is included in the SSO installation. I found it in the following location: c:\Program Files\VMware\Infrastructure\VMware\CIS\vmdird. I created a subfolder on my C: called MDBBackup. In my environment I ran the following command from PowerShell (as an Administrator) to backup the database, and then copied the output files (data.mdb and lock.mdb) to my backup repository:
.\vdcbackup c:\ProgramData\VMware\vis\data\vmdird c:\MDBBackup\
 |
| Backing up the SSO database. |
After you’re all done, you should have some type of backup repository that resembles the following:
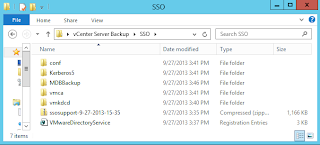.png) |
| Contents of my backup repository including SSO. |
Reference:
Recovery Process
This procedure was used in my lab environment to restore the vCenter Server components from my backup repository. To prepare for this, I rolled my virtual machine back to an earlier point in time using a snapshot, prior to the vCenter Server components being installed. This was the method that I used to simulate the loss of a vCenter server, as I did in my previous
blog post. VMware has also documented a
procedure to restore SSO from a complete operating system backup; however, I will outline how I restored it without an OS backup.
 |
| My virtual machine prior to installing vCenter Server. |
Install and Restore Single Sign-On (SSO)
- Install Single Sign-On.
 |
| Summary of SSO installation selections. |
- Stop each of the SSO services in the order as defined in the VMware KB article.
 |
| SSO services. |
- Import the previously saved VMwareDirectoryService key into the Windows registry. Please note, it can be dangerous to modify the Windows registry. Please do so at your own discretion, and always make a backup first.
- Copy the relevant SSO file folders back to their original locations (as defined previously above).
- Copy the SSO database files to the following folder: %ProgramData%\VMware\vis\data\vmdird.
- Re-start each of the SSO services in the order defined in the SSO services in defined order VMware KB article.
Install vSphere Web Client
- Install the vSphere Web Client
- Post-installation, validate the SSO restoration by logging into the web client using the SSO administrative credentials (i.e. administrator@vsphere.local).
- In my case, I was able to validate the SSO configuration by verifying that my domain identity source (lab.home) existed.
 |
| Verified that my domain identity source was restored. |
Install and Restore Inventory Service
- Install the Inventory Service.
- After the installation has been completed, stop the service associated to the Inventory Service.
- Restore the Inventory Service from previously saved data.
- In my environment I ran the following command from PowerShell (as an Administrator) to restore the data:
.\restore -backup C:\Windows\temp\Inventory_Service_DB.backup
 |
| Restoring the Inventory Service database. |
- Restart the Inventory Service.
Restore the vCenter Database
- Restore the vCenter database using your preferred tools.
- Create a 64-bit ODBC data source.
 |
| Created the ODBC data source for my vCenter Server database. |
Install vCenter Server
- Copy the SSL certificates back to their original location (C:\Program Files\VMware\Infrastructure\VirtualCenter Server\ - in my case). If you forget this step, you will run into all kinds of different problems. For example, I missed this step when I was testing this process, and the ESX hosts remained in a disconnected in the vCenter server.
 |
| Restored the SSL folder to its original location. |
- Remove the appropriate vCenterServer application user from SSO. Refer to Error 29107 below.
- Install vCenter Server 5.5.
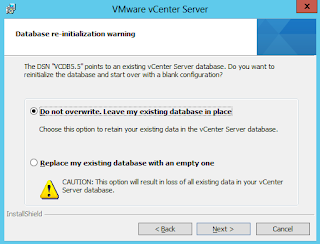 |
| Maintained the existing vCenter database. |
After completing the vCenter Server 5.5 installation, my lab vSphere environment was successfully recovered as you can see in the screen capture below.
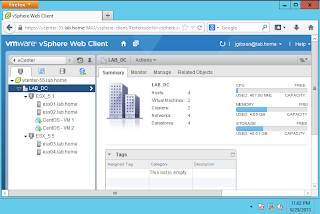 |
| My restored lab environment. |
I encountered a few different errors while evaluating this process. Here are two that I have documented and what I did to work around them:
Reference:
Backing up and restoring vCenter Server 4.x and 5.0 (1023985)


.png)
.png)


